How Can You Reduce the Drape of a Cowl Neckline?
Table of Contents
To reduce cowl neckline drape, remove some of the extra width in the drape area rather than simply raising the neckline edge. The goal is to make the cowl neck pattern sit higher and closer to the body while keeping the shoulder seams, side seams, armholes, and other construction seams compatible with the original garment.
The safest approach is to trace the original front pattern, fold or slash out a small amount of fullness near center front, redraw the neckline smoothly, and sew a test garment in fabric with similar stretch and weight. A cowl is highly dependent on fabric behavior, so a change that looks modest on paper can produce a noticeably different neckline when sewn.
Why a cowl neckline droops
A cowl neckline is not merely a low neckline. Its folds come from deliberate excess fabric added between the shoulder area and center front. Patternmakers commonly create that excess by slashing and spreading parts of the upper front pattern, moving dart intake toward the neckline, extending the neckline, or combining those methods.
The more fabric that is added to the center-front neck area, the more potential there is for deep folds and a lower-looking neckline. Fabric choice changes the result further. A fluid knit or a bias-cut woven tends to collapse into softer, deeper folds, while a stable fabric may stand away from the body or form less graceful bulk. As one cowl-drafting tutorial notes, moving fullness into the center-front neck also lowers the neckline as it drapes on the body (Aria Pattern).
For a cowl that feels more like a soft mock turtleneck, you generally need less horizontal excess at the front neck and, in some designs, a slightly higher neckline shape.
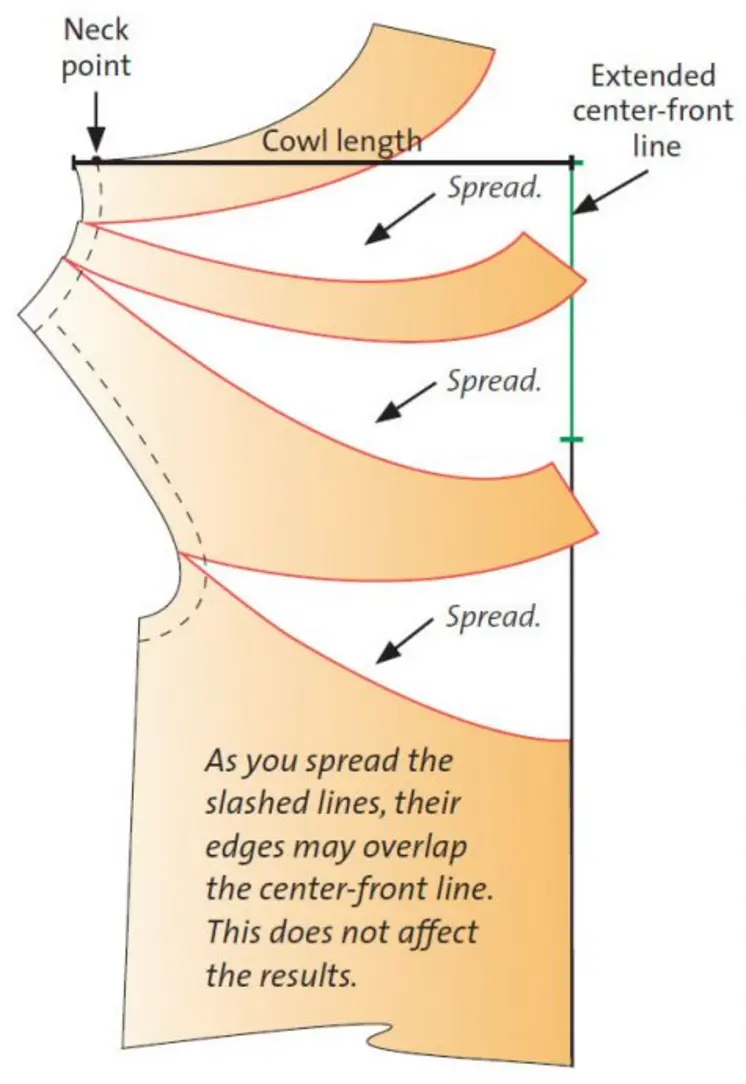
Source: images.threadsmagazine
Start by deciding what should stay the same
Before altering the pattern, identify the design features you want to preserve:
- Some visible cowl folds rather than a plain high neckline
- The original shoulder and side-seam lengths
- The existing sleeve and armhole relationship
- The garment’s original ease through the bust and body
- A neckline that can still be pulled over the head, if the garment has no opening
This matters because reducing neckline fullness should not accidentally make the shoulders too short, distort the armhole, or remove bust shaping. A cowl front often carries both styling fullness and functional shaping. If you remove a large amount of fabric indiscriminately, the front may become tight across the bust or pull upward at center front.
Trace the original cowl neck pattern first
Never cut directly into the only copy of a commercial pattern. Trace the front bodice, including grainline, center front, notches, seam allowances, bust point if marked, and stitching lines.
Then mark the parts that must remain unchanged. In most cases, these are the shoulder seam, side seam, armhole, and the seam or fold that joins the front to the rest of the garment. Draw the stitching lines if they are not already printed. Altering the cutting edge is sometimes necessary, but the seam lines are what determine whether the altered piece will still sew to its matching pieces.
A sewing discussion about tightening a cowl similarly recommends working from a copied pattern and keeping the actual stitching lines unchanged where seam compatibility must be preserved (Reddit discussion). That is a useful principle, especially when the original pattern has sleeves, facings, or a collar piece drafted to fit a specific neckline.
Reduce fullness with a controlled fold-out
For a moderate reduction in drape, a fold-out is usually easier to evaluate than immediately redrafting the entire neckline.
1. Find the fullest part of the cowl
On many cowl fronts, the excess is concentrated between center front and the shoulder-neck area. Lay the pattern flat and look for the section that extends outward or downward compared with a standard fitted neckline. This is the area that creates the hanging folds.
If the front is cut on the fold, the center-front edge is especially important. A large curve, extension, or angled shape there often indicates added drape volume.
2. Simulate the reduction on paper
Pin or tape a vertical or angled fold in the center-front cowl area, as though you were temporarily pinching excess fabric out of a finished garment. Start small. The fold can taper to nothing before it reaches any seam line that must remain unchanged.
A center-front fold-out removes width from the cowl area. As the paper overlaps, however, the pattern may buckle or refuse to lie flat. That is expected: you are changing a three-dimensional drape shape on a flat pattern.
3. Slash and reposition the paper
Cut along the fold line or slash line, stopping before the protected seam line so the section remains hinged. Spread or overlap the paper until it lies flat again. Tape it to new paper beneath it.
Depending on the original draft, one section may need to overlap while another needs a small gap. This is normal. The purpose is not to force the original edges to remain unchanged everywhere; it is to remove excess in the cowl while retaining the seams that join other pattern pieces.
4. Redraw the neckline and cutting edge
Redraw the neckline into a smooth line after the pattern is flattened. Avoid sharp corners at center front or shoulder neck. A sudden angle can create a point, a twist, or an awkward fold once the neckline is turned, faced, or bound.
If your pattern uses a neckline facing, lining, collar, or neckband, trace and alter that matching piece after finalizing the new neckline. Do not assume the original facing will still fit.
Raise the neckline only after controlling the width
Raising the neckline can help the cowl sit closer to the neck, but raising it alone does not necessarily reduce droop. A high neckline with too much extra width can still collapse into deep folds or stand away from the body.
After reducing the cowl neckline fullness, raise the neckline gradually if needed. Add height at center front, shoulder neck, or both, depending on where the neckline feels too low. Blend the new line into the original shoulder and center-front areas rather than drawing a steep curve.
For a mock-turtleneck alteration, think of the result as a high, shallow cowl—not a conventional separate turtleneck collar. A true turtleneck normally relies on a distinct collar or band with controlled circumference and height. A high cowl retains extra fabric, but it needs only enough fullness to make soft folds.
If you want a substantially higher neckline, consider whether the original cowl should be replaced with a separate mock-turtleneck collar. This gives more structure and predictability, but it changes the design and will reduce the loose cowl effect.
Keep bust shaping in mind
A common mistake is to remove fullness from the cowl without considering whether some of it came from a dart rotation. In many cowl designs, a side or waist dart has been partially or fully transferred into the neckline. The neckline drape therefore contributes to shaping over the bust.
If your altered front becomes tight, pulls toward the armhole, or creates diagonal drag lines from the bust toward the neck, you may have removed shaping as well as style fullness. Restore some shaping by reducing the fold-out, retaining a small bust dart, or distributing less of the original dart intake into the neckline.
Fashion-Incubator’s discussion of a cowl-neck correction highlights this balance: changes around center front, shoulder width, armhole shape, and bust fullness can affect one another, and draping the change can sometimes reveal the relationship more clearly than a flat adjustment alone (Fashion-Incubator).
Sew a test garment before cutting the final fabric
A sewing test garment is essential for this alteration. Use fabric with approximately the same stretch, weight, recovery, and drape as the final material. A stable ponte knit, a lightweight rayon jersey, and a rib knit can all produce very different cowls from the same pattern.
Sew enough of the test to evaluate the neckline accurately: join the shoulder seams, finish the neckline as the pattern instructs, and include the upper body or at least enough side seam to stabilize the fit. Try it on and assess these points:
- Does the neckline sit at the desired height?
- Does it form one or two soft folds rather than dropping deeply?
- Does it stand away from the neck?
- Can you pull the garment over your head comfortably?
- Does the front remain smooth over the bust?
- Does the altered neckline still match its facing, binding, collar, or lining?
Make one change at a time. If the cowl is still too low, remove a little more width or raise the neckline slightly. If it has become stiff or too close-fitting, restore some of the removed fullness rather than immediately enlarging every edge.
Avoid these shortcuts
Simply taking in the shoulder seams may reduce some drape, but it also changes shoulder width, armhole shape, and sleeve fit. It is better reserved for a garment that is genuinely too wide through the shoulders.
Likewise, shortening only the center-front edge can distort the neckline curve or make the garment pull upward. A cowl’s shape comes from the relationship between its neckline length, center-front extension, grain direction, and fabric behavior.
Do not rely on a finished-garment tuck as the final solution unless you are intentionally adding a visible dart or pleat. A temporary pin can help you identify where excess should be removed, but the pattern needs to be reshaped so it can lie flat and be cut accurately.
The practical target: a shallow, supported cowl
The best way to reduce cowl neckline drape is to narrow the extra fabric at the cowl, preserve the garment’s seam relationships, and refine the neckline height through a test garment. Start conservatively, because it is easy to remove more volume after sewing the first sample, while restoring a dramatic cowl after over-removing fullness requires redrafting.
A successful adjustment will not look like a completely different neckline. It will retain the soft volume you like, but it will sit higher, feel more secure, and read more like a relaxed mock turtleneck than a deep draped cowl.
References
- Pattern Puzzle: Fixing a cowl neckline pt.2 – Fashion-Incubator. fashion-incubator.com. https://fashion-incubator.com/pattern-puzzle-fixing-a-cowl-neckline-pt2
- Cowl Neck Pattern Adjustment | Drafting - Aria Pattern. m.youtube.com. https://m.youtube.com/live/QRso7rDg1Vg?pp=QAFIAg%3D%3D
- Pattern Puzzle: Fixing a cowl neckline - Fashion-Incubator. fashion-incubator.com. https://fashion-incubator.com/pattern-puzzle-fixing-a-cowl-neckline
- Reducing Drape of Cowl Neckline : r/sewing - Reddit. reddit.com. https://www.reddit.com/r/sewing/comments/1adwnzj/reducing_drape_of_cowl_neckline
- FASHION DRAPING COWL - Fibre2Fashion. static.fibre2fashion.com. https://static.fibre2fashion.com/articleresources/PdfFiles/63/6219.pdf
- How to Modify a Cowl Neckline - Love Notions Sewing Patterns. lovenotions.com. https://www.lovenotions.com/how-to-modify-a-cowl-neckline
- Free Sewing Tutorial: Draft a Cowl Neck | PoldaPop Designs. poldapop.com. http://www.poldapop.com/2012/04/free-sewing-tutorial-draft-cowl-neck.html
- Learn How to Sew an Elegant Draped Neckline to a Simple Shirt Pattern. threadsmagazine.com. https://www.threadsmagazine.com/2013/11/18/how-to-create-a-draped-cowl-neckline