How Can You Stop Stretch Fabric From Puckering While Sewing?
Table of Contents
Stretch fabric puckering usually stops when you identify whether the seam is being pulled tight by thread tension or physically stretched while it travels under the presser foot. Start with a fresh stretch or ballpoint needle, sew a test swatch without pulling the fabric, and adjust one machine setting at a time. If the seam is wavy rather than tightly gathered, uneven feeding or too much presser-foot pressure is often the more likely cause.
The important distinction is simple: tension puckering happens when the stitches draw the fabric together, while stretching distortion happens when the fabric is lengthened during sewing and ripples after it relaxes. A single fix will not solve every case of stretch fabric puckering, so test before sewing the garment.
Source: blog.closetcorepatterns
First, identify what the seam is telling you
Look at the seam while the fabric is lying relaxed on a flat surface.
- Small, tight wrinkles concentrated along the stitch line usually suggest excessive thread tension, an unsuitable needle, stitches that are too short, or a needle that is too large for the fabric.
- A broad wavy or “lettuce-edge” effect usually means the fabric stretched as it passed through the machine. High presser-foot pressure, uneven feeding, or pulling from either side can cause it.
- Skipped stitches plus puckering often point to a needle problem first. Stretch fabrics can be sensitive to needle type, condition, and size.
- One layer ends up longer than the other suggests the layers did not feed through at the same rate.
A useful diagnostic method from WAWAK’s stretch-fabric troubleshooting guide is to cut the top and bobbin stitches in a short section without immediately pulling the thread out. If the seam relaxes and lies flatter, tension is likely too high. If it remains distorted after the stitches are removed, the issue may be stitch length, needle size, or stretching during feeding.
Make a test swatch before changing the garment
Cut two scraps from the same fabric, with the same number of layers and grain direction as the seam you plan to sew. If the garment seam will join two layers, your test must also have two layers. A single-layer test can look fine while the real seam waves or tunnels.
Mark each test with its settings: needle type, stitch, stitch length, tension setting, and foot used. Sew several short rows rather than changing every setting in the middle of one seam.
After each sample:
- Let the fabric relax without holding it stretched.
- Check whether the seam lies flat.
- Gently stretch the seam across its width.
- Look for popped stitches, excessive ripples, skipped stitches, and thread loops.
- Press the sample appropriately for the fiber content, using a pressing cloth when needed.
This process matters because the best settings vary with fabric weight, fiber content, knit structure, and how much stretch the material has. A stable cotton jersey and a slippery spandex blend may need different handling even when both are called knit fabric.
Use the right needle before adjusting tension
For most knit fabrics, begin with a new ballpoint or stretch needle. Ballpoint needles are designed to pass between knit loops more gently than a sharp universal needle. Stretch needles are often useful for highly elastic knits, including fabrics with significant spandex content, where skipped stitches can be a problem.
A damaged, dull, bent, or incorrect needle can worsen puckering and cause inconsistent stitches. Replace the needle rather than assuming tension is the issue, especially if the problem begins suddenly.
A discussion in r/SewingForBeginners specifically suggested a stretch or ballpoint needle along with a zigzag stitch for a reader struggling with stretchy fabric. That is a useful starting point, but the final choice should still be confirmed on a swatch because different knits respond differently.
Choose a stitch that can stretch with the fabric
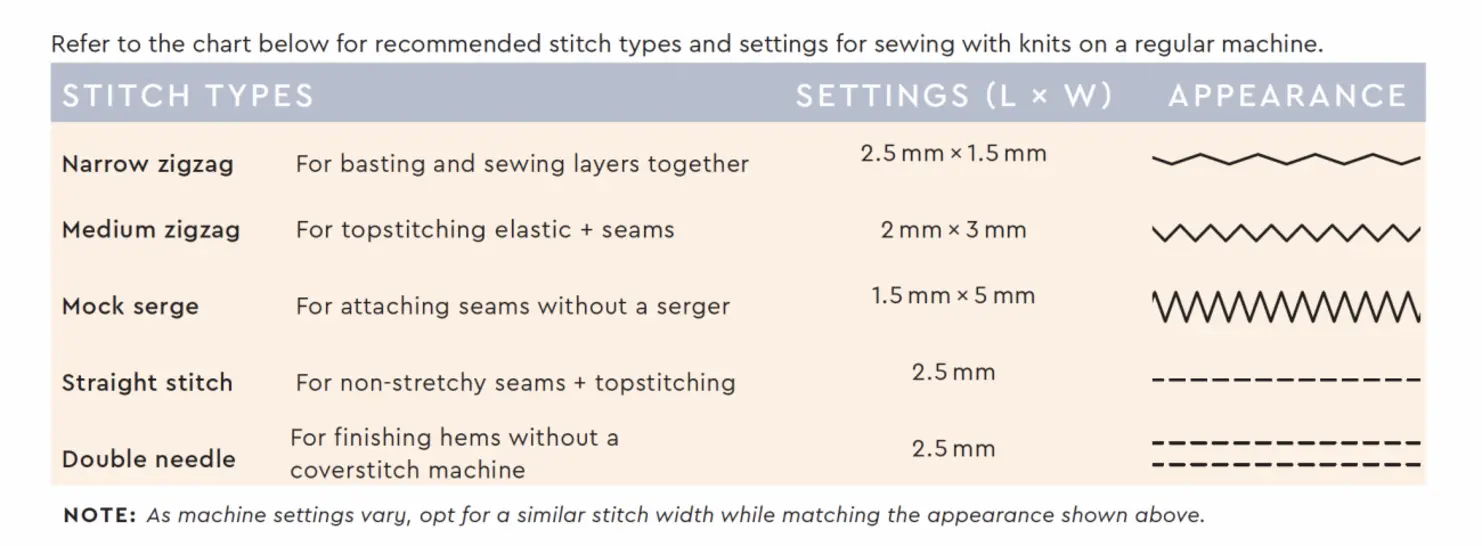
A regular straight stitch can work for some seams that will not need to stretch much, but it may snap when the garment is worn. For seams that must stretch, test a narrow zigzag or your machine’s designated stretch stitch.
A narrow zigzag gives the seam room to extend. A stretch stitch may also work well, but some stretch stitches are dense and can distort lightweight fabric if the settings are not balanced. If the seam looks tightly packed or stiff, try a less dense option or a slightly longer stitch length on a new test swatch.
For hems, a twin needle can produce a ready-to-wear appearance while allowing some stretch. However, it can still create tunneling or waviness if the fabric is stretched during sewing. Stabilizing the hem and testing the setup remain important.
Reduce the chance that the fabric stretches under the foot
The machine should move the fabric; your hands should guide it. Do not pull the fabric from behind the presser foot or stretch it from the front to make it feed faster. Even light pulling can lengthen a soft knit enough to create wavy seams after it relaxes.
If your sewing machine allows presser-foot-pressure adjustment, reduce the pressure slightly and test again. Excess pressure can grip and stretch knit fabric as it feeds. WAWAK notes that lowering presser-foot pressure, using a longer stitch, and testing settings can help when stretch-fabric edges become wavy.
A walking foot, also called an even-feed foot, can be especially helpful when sewing knit fabric with two layers, slippery surfaces, or uneven stretch. It helps move the top layer along with the lower feed dogs so one layer is less likely to creep ahead of the other. It is not a substitute for correct tension, but it can address a feeding problem that tension adjustments cannot solve.
In a r/sewhelp discussion, a user response attributed waviness to fabric stretching during sewing and suggested reducing foot pressure or using a walking foot. That is consistent with the common distinction between a wavy stretched seam and a tightly puckered tension seam.
Adjust sewing machine tension carefully
Do not begin by dramatically changing tension. First, rethread the machine with the presser foot raised so the upper thread can enter the tension discs correctly. Check that the bobbin is inserted according to the machine manual and that thread is unwinding smoothly.
Then test a small adjustment to upper tension. If the seam is visibly drawn together and releasing a few stitches makes it flatten, reduce the upper tension gradually. If loops appear on the underside, upper tension may be too loose or threading may be incorrect.
Avoid changing bobbin tension unless you know it is the source of the issue. For most home sewing machines, upper-thread adjustments, correct threading, needle replacement, stitch selection, and feeding technique should be tried first.
Stabilize difficult seams and hems
Very light, slippery, highly elastic, or loosely knit fabric may need temporary support. Tissue paper placed beneath the fabric can help prevent it from being pulled into the needle plate and can reduce distortion while sewing. Tear it away carefully after stitching.
For hems, lightweight fusible interfacing or an appropriate temporary hem tape can help hold the edge in shape before stitching. Sabrina Lee’s guide to sewing knit fabric without puckering recommends combining a walking foot, tissue-paper stabilization, and pressing rather than relying on one change alone.
Use stabilization selectively. A support layer may be valuable on a delicate neckline, curved edge, or thin jersey hem, but it may be unnecessary for a stable knit that feeds smoothly.
Press the seam without stretching it
Pressing can remove minor ripples and help stitches settle, but it cannot fully correct a seam that was sewn while stretched. Press rather than iron aggressively: lift and lower the iron instead of dragging it along the seam. Use the temperature appropriate for the fabric and a pressing cloth when there is any risk of shine, melting, or scorching.
If steam improves the seam only temporarily and the waves return after cooling, revisit presser-foot pressure, feeding, and handling rather than depending on pressing as the permanent fix.
A practical order for solving stretch fabric puckering
When a seam puckers or turns wavy, work through this order on scraps:
- Insert a new stretch or ballpoint needle.
- Rethread the upper thread with the presser foot raised.
- Choose a stretch-capable stitch and test a modestly longer stitch if the seam is dense.
- Sew without pulling the fabric.
- Lower presser-foot pressure if your machine offers that adjustment.
- Try a walking foot if the layers feed unevenly.
- Add tissue paper or another suitable temporary stabilizer for difficult fabric.
- Adjust upper tension only in small steps when the seam is being drawn tight by thread.
This sequence prevents a common mistake: trying to correct a feeding problem solely with tension. Once the fabric enters the machine evenly, the needle, stitch, tension, and pressure can be tuned for a seam that lies flat, stretches when needed, and stays comfortable in wear.
References
- How to Sew Knit Fabric Without Puckering — Sabrina Lee. sabrina-lee.com. https://www.sabrina-lee.com/blog/2021/6/15/how-to-sew-knit-fabric-without-puckering
- How To Sew Stretch Fabrics. blog.wawak.com. https://blog.wawak.com/post/how-to-sew-stretch-fabrics
- Sewing Stretchy Fabrics: Pro Tips for Smooth, Flat Seams – packlove. mypacklove.com. https://mypacklove.com/blogs/patches/knit-vs-woven-what-makes-fabric-stretchy
- Sewing with Knit Fabrics: Tips to Avoid Stretch Distortion – Sewing Studio Fabrics. sewingstudio.com. https://www.sewingstudio.com/blogs/news/sewing-with-knit-fabrics-tips-to-avoid-stretch-distortion
- What is the cause of puckering in knit fabrics?. quora.com. https://www.quora.com/What-is-the-cause-of-puckering-in-knit-fabrics
- Top 5 Stretch Fabric Sewing Mistakes (And How to Fix Them) – Spandexbyyard. spandexbyyard.com. https://spandexbyyard.com/blogs/spandex-vs-other-stretch-fabrics-type-explained/stretch-fabric-sewing-mistakes
- IF YOUR JERSEY, YOUR LYCRA AND YOUR KNIT .... facebook.com. https://www.facebook.com/osccollegeoffashion/posts/if-your-jersey-your-lycra-and-your-knit-fabric-always-pucker-along-the-seam-it-i/1620657186295686
- Fabric puckering and wavy, what stitch to use with stretch .... reddit.com. https://www.reddit.com/r/sewhelp/comments/wkgo8x/fabric_puckering_and_wavy_what_stitch_to_use_with